Fundamentals of Photography: 15 Essential Tips to Help Improve your Compositions
Composition is one of the hardest parts of photography. With time the settings become second-nature but even the most experienced, skilled photographers will still have days where they just can’t get the image they want. In this article, I’ve put together 15 tips you can use to improve your composition skills.
What is Composition?
Simply put, composition in photography is how you arrange the different visual elements in a scene in your photograph. Much the same way as a musical composer can put together music with different instruments and melodies to produce an overall piece of music, as photographers we combine all the different elements within our scene to produce an overall pleasing image.
You will often see “rules” of composition in photography, but these are certainly not ideas to be followed 100% of the time. Composition is very much down to personal taste, but many of the tips have been used consistently throughout history in the arts and have proved the test of time. Many of these tips also contradict each other, so it is up to you to see what you like the most in each situation.
Different techniques in composition can drastically change the outcome of your photos. You can take two images in the same place using a different technique and get vastly different photos, but the overall choice is up to you.
Composition is a really tricky thing to master, and I’m certainly still learning every time I go out with my camera. With time and experience however, you will start to instinctively see how to compose different scenes to really capture the beauty of where you are. There is no one perfect technique though, so having an idea of different ways to compose an image can help you explore what works best in different settings, as well as what you like the most. After all, most of us do photography primarily to get images that we like looking at ourselves!
I’ve put together a list of 15 essential tips to use in composition, but this is by no means an exhaustive list.
1) Experiment First
What I mean here, is don’t just walk to somewhere new, set up your tripod, take a few photos and head off again. Chances are, by exploring the area beforehand you will find a better composition. You are also more likely to find more interesting compositions as often you will be drawn to the obvious, but not necessarily the best.
Be sure to give yourself enough time in any one place to do some exploring, particularly if you have time constraints with light (eg sunrise or sunset). This means you will know where you need to be and how to get set up before you get that perfect light. There will always be times where suddenly the conditions become perfect, and you have to find your composition in a hurry, but generally the more time you give yourself the more likely you are to get the best composition.
As you are exploring, if you see a composition that looks good do a test run first. Use the camera on your phone or just hand-hold your camera on auto mode (so you don’t have to fiddle with settings) and take a few experimental shots to see how they come out in terms of composition. It might just be that you need to move a few inches to the side, up or down to really nail your composition. You can also play around with different focal lengths, zooming in and out and changing what is included in your composition.
Once you’re happy you’ve found a good composition, you can then get your tripod set up and think about filters and so on, and then wait for the best conditions/light.
2) Including Foreground, Midground and Background
When we look at a photograph, we want our eyes to be drawn throughout the image, particularly in landscapes. To keep interest throughout the image we therefore need to include different elements or layers. The emphasis on each layer will be different in each image, but it is important to always consider how each layer interacts. Sometimes layers will be a very quick pit-stop for the eyes before landing on the main focus of the scene, other times each layer will have its own focal point, so our eyes will pause on each layer to take in the details.
Foreground is the closest part of the image to the camera, and background is the furthest, with midground unsurprisingly in the middle. Generally, the foreground will be the first part of an image that our eyes land on, then move through the midground to end up on the background. You don’t necessarily need to have all three elements in an image, but images lacking any of these can feel a bit disjointed.
By using all 3 elements you also add depth to your image, bringing a sense of 3D to an otherwise 2D image. This works especially well with wide-angle shots as there tend to be more elements in your composition. By including all three elements, when done well you will guide the viewer’s eyes through the whole image.
For example, in the image here, the pebbles on the beach in the bottom right of the image act as the foreground. The rocks in the sea draw the eye through as midground to then end up on the background of the cliffs and the sunset.
3) Rule of Thirds
This technique divides your image into 9 equal sections, split by two horizontal and two vertical lines (as shown in the example image). Just to reiterate, despite being called a ‘rule’ you definitely do not need to follow this in every photo. The aim here is to put the important elements, subjects or transition points of your photo along the lines, or if possible, where the lines meet at intersections. This prevents you putting the main element right in the middle of the composition, which normally leads to a less powerful image. By putting the main elements on one of the left/right/upper/lower thirds, it tends to allow you to create more balance and flow in the image as well. In the example image here, the lakes are running along the bottom third line and the mountains run along the upper third line. As well as separating different elements in the composition this also helps to help the eye flow through the image from foreground to background.
4) The Fibonacci or Golden Spiral
The Fibonacci spiral, or Golden spiral, is in theory a mathematical explanation of getting the most aesthetically pleasing design. You start with a rectangle, then split it into a square and a smaller rectangle. This then essentially repeats itself getting smaller and smaller shapes, and a line following the corners of the squares generates the curve.
This spiral occurs frequently in nature, such as the shape of a snail’s shell or within flowers and petals. In photography, this technique is a fantastic way of ensuring the viewer’s eyes go through the whole image by following the curve.
In the example here, the curve takes you through the full image following points of interest (eg where sea meets sand) to end up on the focal point of the cliffs. The horizon is also placed along the line of one of the larger 2 rectangles of the golden spiral.
You may well find yourself instinctively going for compositions that fit this golden spiral – have a look back through your previous photos and see if any of them fit well!
5) Balance
The last two techniques involve putting the main parts of your composition to one side of your image. On the whole this makes for a pleasing image. As a result, it is important to try and balance your composition, so that there is not one side/half of your image that has no interest whatsoever. When your main element is on one side of the composition, you’ll want to generally include a less important element on the other side to balance the image out, without stealing too much focus away from the main element. In this example image, the main focus is the rock stack on the left, but the more distant rock stack on the right-hand side acts as a secondary element.
6) Symmetry
Scenes with symmetry are a time you can easily get away with, and really benefit from, having your main element in the centre of the image. It’s normally easier to find symmetry in man-made structures, but very occasionally you’ll see some in nature as well. You can look to find symmetry both vertically and horizontally. Reflections in water are a perfect opportunity for horizontal symmetry, as seen in the example photo here.
7) Layers
You can look for layers in your composition as a way of guiding the viewer through the composition, as well as adding some depth and dimension. You can use different parts of your composition (fore, mid and background) to create these layers. Alternatively, you will sometimes find natural layers in your subject, particularly with mountains. In this example, there are alternating layers of trees on the mountains to the left and right, with the more rocky mountains as the background.
8) Framing
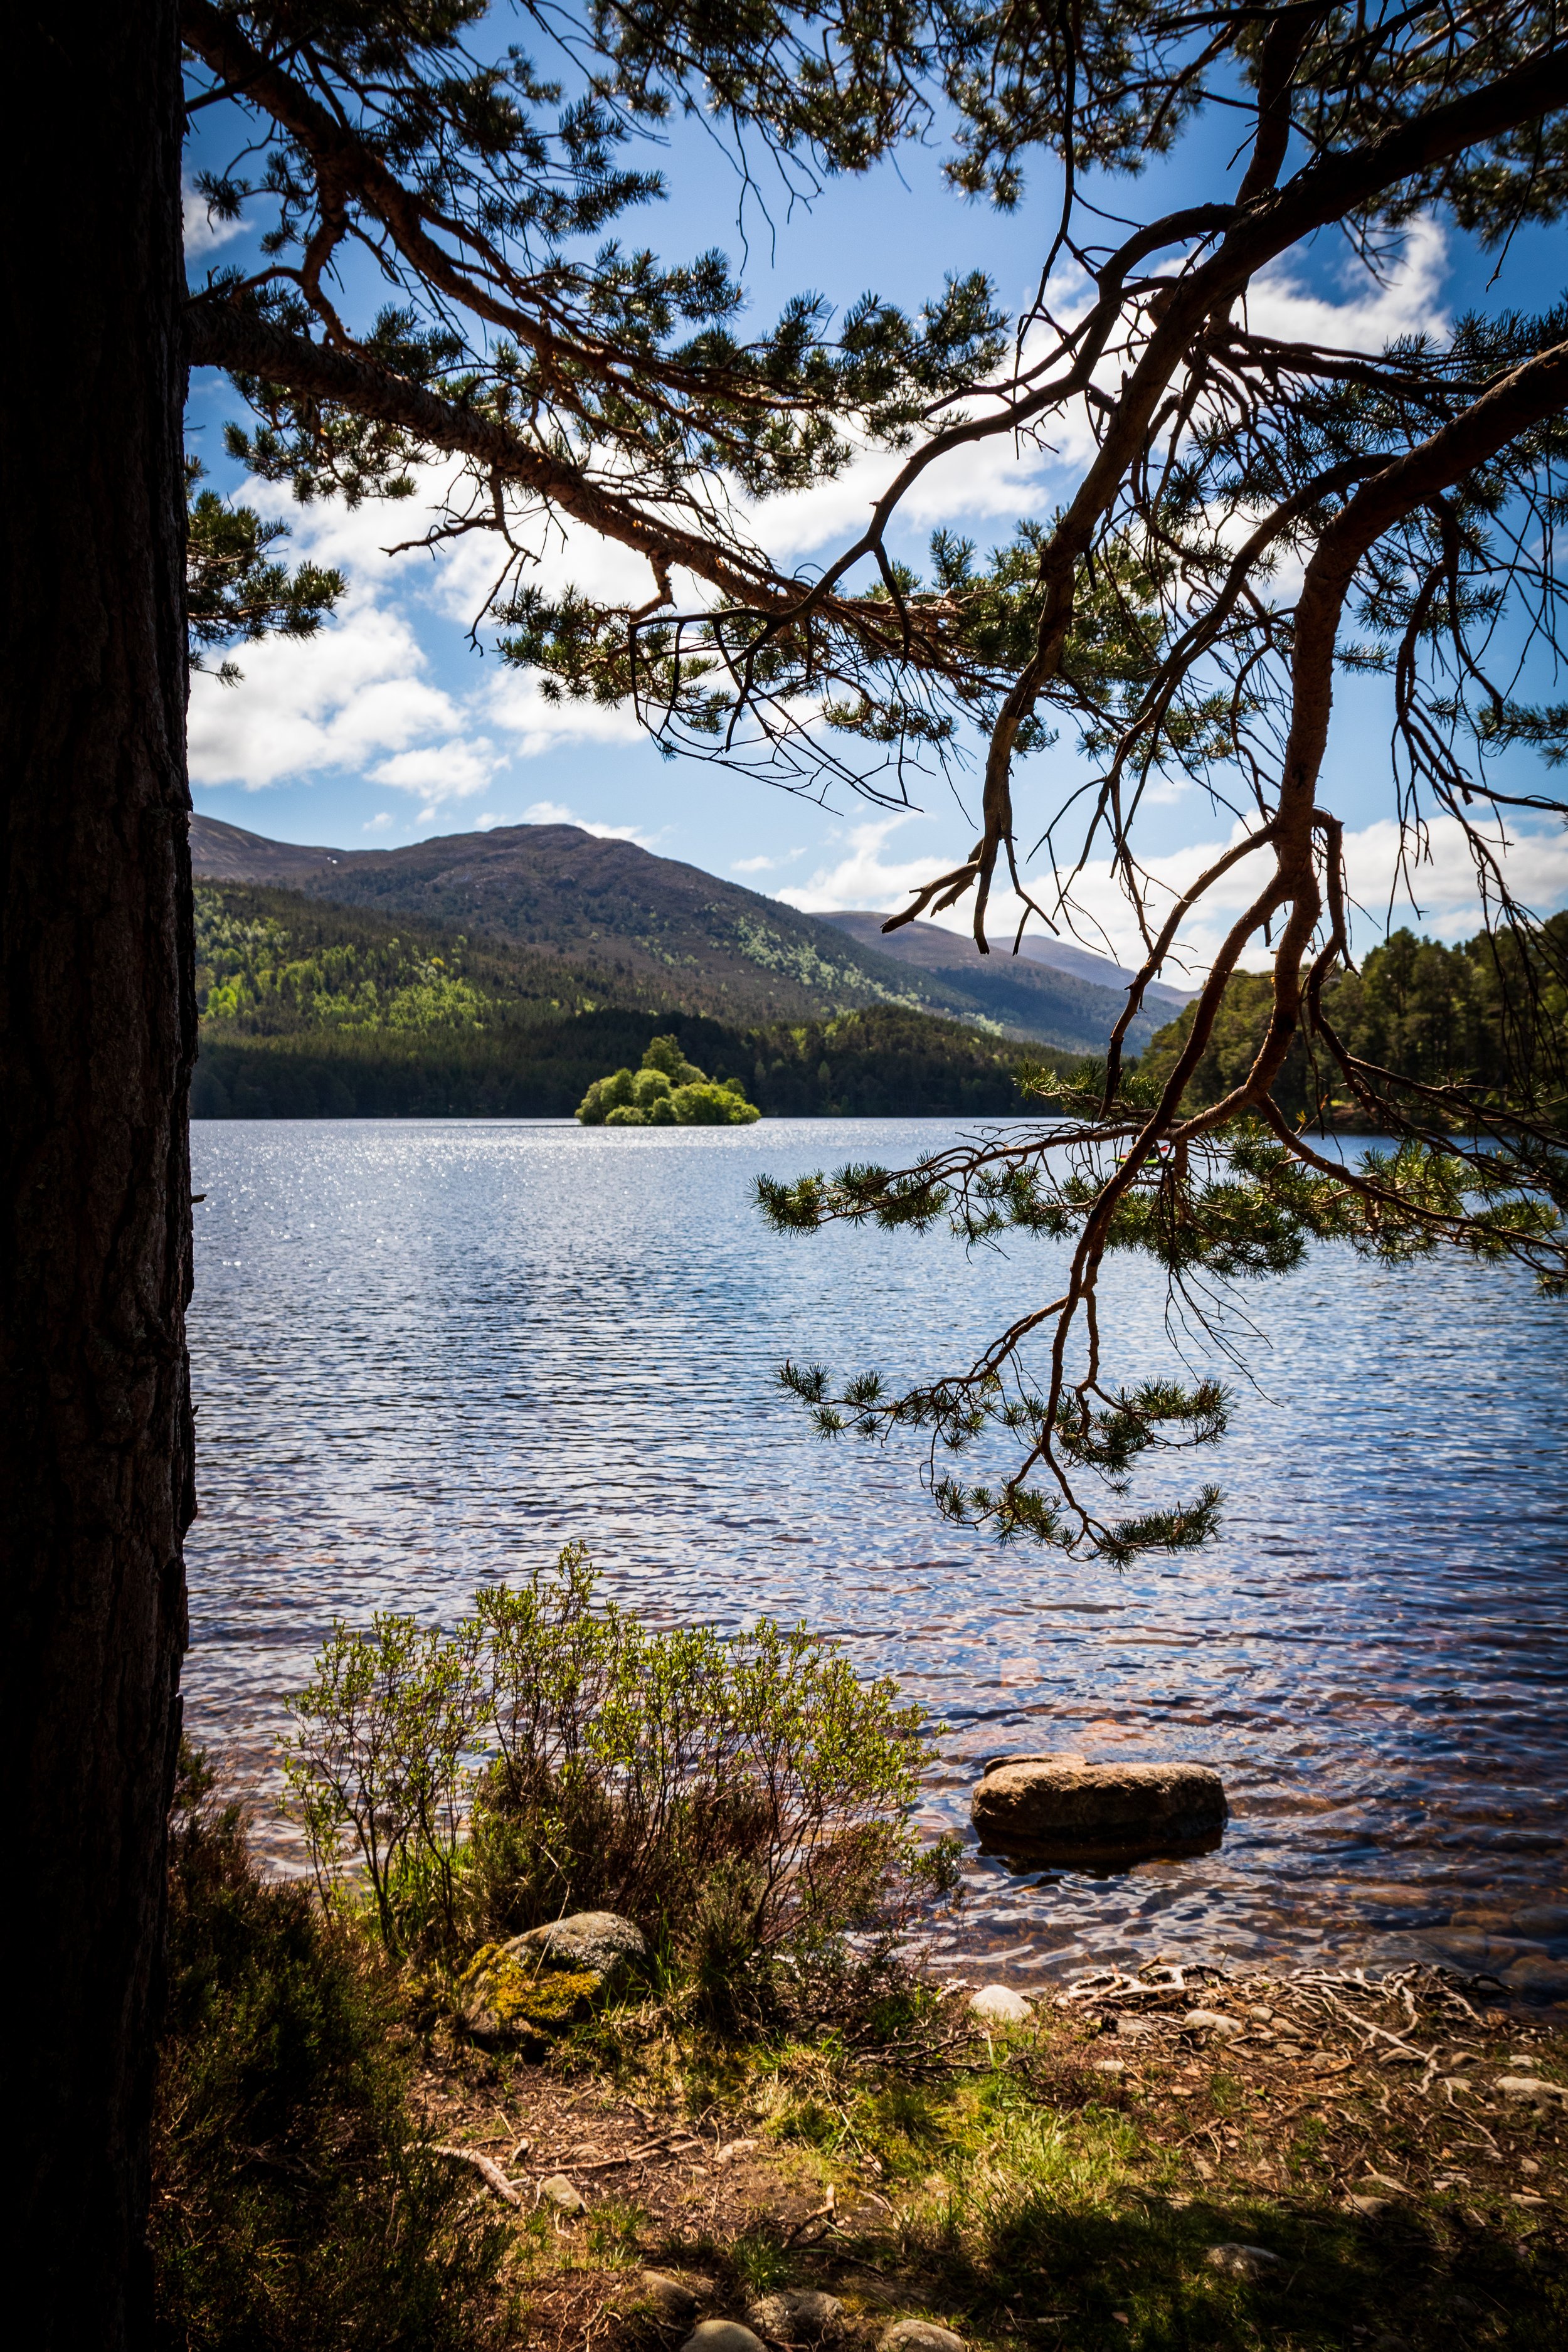
Framing involves using some elements of your composition to frame others, much like the frame around the outside of a painting. You can achieve this through more typical frames, such as a window or doorway, or look for more natural frames such as caves, tunnels or trees. In the example here, the tree trunk to the left and branches above form a rough frame for the lake in the background.
9) Leading lines
Leading lines are exactly what they sound like. Linear elements that go from front to back in your composition are another tool to guide the viewer’s eye through the image. These work particularly well when running at a diagonal through the image, as it takes the viewer through both sides of the image to the background. Leading lines can come from anywhere, so you can be very creative with them, for example roads, paths, water, tree branches and so on - anything that directs the viewer from one part of the image to another. In this example, the road carries the eye through the image from left to right then front to back.
10) S-curves
Commonly used in other forms of art, S-curves are also known as the ‘line of beauty’. These are another form of leading line but they move from side to side through the image as you move from foreground to background. These can work brilliantly with man-made things like roads and paths, but similarly with the right timing can be achieved really well with seascapes and rivers. It can help to make sure there is nothing obscuring the element that makes the S-curve, just so there is nothing that breaks up the curve as it flows through the image.
11) Wide angle
Wide angle shots are the what most people associate with amazing vistas in landscape photography. However, they are easy to do badly, and I’ve done my fair share (and probably some more!). It’s not quite as simple as hiking to the top of a mountain, sticking your wide-angle lens on the widest focal length and taking a photo. Adding to some of the points above, it is really important to ensure there is something driving the viewer’s eye through the image in an intentional way. Wide-angle shots will include a lot of elements in them, so you need to build a relationship between and connect these elements in some way. In the example, the S-curve in the road takes the viewer through to the lake and mountains in the background.
12) Long focal lengths
Using longer focal lengths can help you compress your image and give the appearance that the background is much closer to the foreground than it is in reality. You can also really isolate particular features to a degree that is not otherwise possible with the human eye, normally as you cannot physically get close enough! This is a powerful tool to find really unique compositions. When visiting more well-known locations, you will often find other people have taken a similar image, not that this is a bad thing. By using a long lens to pick out smaller details in the landscape you can find a totally new perspective.
13) Simplicity and Negative Space
Many of the techniques above have been based on guiding the viewer through an image with multiple elements. In contrast to this, it can be really effective to make a simple composition with very few elements, even a single element. This will obviously put a huge amount of focus on the main element, so it needs to be something interesting enough to draw attention.
Along the same lines, using negative space can help to keep focus on particular elements in your image, purely because there is nothing else in the image to detract attention.
14) Point of View
By this I mean where the camera is in relation to the elements in the image, and is particularly important in wider-angle images. Changing how high or low the camera is compared to the foreground can drastically change the overall effect of the image. You can use this to either add or take away focus from different elements in your image. For example, having the camera higher up but pointing lower down will mean your foreground takes up a larger proportion of the image, adding weight to it. Similarly, getting low down can also add weight to your foreground, as was done in the example image here.
15) Scale
Particularly when shooting grand vistas, it can be really powerful to put in something with a known size to add scale to your image. A really wide-angle view can hide the actual size of the elements in your images, such as mountains. Including people in your photos is an easy way of showing the overall size of the other elements, as everyone will be able to see the relative difference in size between the person/people and the surroundings.
Summary
As mentioned above, this has not been an exhaustive list and in no way am I recommending that you only take photos following the techniques above. However, I do hope these tips will give you some ideas to have in your mind when you next go out to make finding that perfect composition a little bit easier. As always, happy photographing!


